Don't miss out!
Subscribe via social media or newsletter to receive free photography tips.
Some photographers subscribe to the belief that making a good landscape photo is about ‘being at the right place at the right time’. In reality, it’s not just about being lucky. To capture a truly compelling image takes some degree of planning.
If coming home with an amazing shot or set of images is a goal you aspire to, then one of the best things you can do is to plan time out for photography in advance. It’s a much better approach than just shooting whenever you have a few spare minutes.
Planning a landscape photo shoot ahead of time puts you in the best position to make the most of extraordinary conditions or even unexpected events.
To improve your chances at your next shoot being a success, read on to learn some useful planning strategies that will help you to prepare for your next landscape photography trip out in nature.
You can also navigate using the Table of Contents on the right-hand side of the screen.
The first step in planning involves researching the destination of your next landscape photography trip. This ensures that you’ll be well prepared when you actually go there to shoot.
Part of your research should involve figuring out when to visit for the best conditions, as well as to make the most of any other special events that might maximise your chances of producing a great landscape photograph.
Some important factors to consider include seasonal changes, lighting and the weather.
The way that nature presents itself changes dramatically throughout the year. If you’re keeping a list of destinations to photograph, then it’s a good idea to research how these places will look during each of the seasons.
Seasonal photography is all about being prepared as a landscape photographer to be at the place that you want to shoot when nature is at its most photogenic or when it suits your narrative for storytelling.
Keep in mind that this may not always align with the best time to travel.
If you want to photograph the Northern Lights, then you’ll need to visit a location where the aurora borealis is visible. A little bit of research will reveal that the Northern Lights are most visible within the Arctic Circle during autumn and winter, when the skies are dark.
You won’t have much of a chance to photograph the aurora at all if you visit the Arctic during the summer season, when there are 24 hours of daylight. This is because darkness is fundamental to being able to see astronomical phenomena.
Similarly, the best time to photograph waterfalls depends largely on the season. Some streams and rivers originate in alpine areas or are fed by glaciers, so they’ll be at their most powerful during spring when the temperatures rise and meltwater flows down from the mountains. Others may look their best after heavy spring rain in the days leading up to your visit.
Once you have an overall season in mind, it’s time to narrow down your research to the day. Just like famous landmarks, nature has its busy periods and quiet periods too. If you want to have your destination all to yourself or if you want to capture the liveliness of a particular scene, then you should plan accordingly.
In general, popular attractions are busier on the weekends, particularly during the day. They also tend to be more crowded during sunset than sunrise, as it’s easier for people to stay out late than it is to get up early.
Crowds aside, the best time of day for landscape photography depends on your subject and what you’re hoping to achieve. Most photographers prefer to shoot during five distinct timeframes – blue hour, golden hour, sunrise, sunset and at night. These are the times during which you’ll often find the most interesting lighting conditions.
You can find out more about these distinct timeframes below.
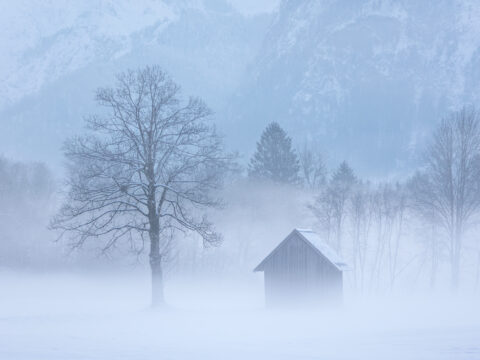
Blue hour is the twilight that occurs before sunrise and after sunset, when the Sun is between 4° and 8° below the Earth’s horizon. During this period, the light is scattered through the atmosphere and takes on a softer quality across the blue colour spectrum.
The duration of blue hour depends on the season and latitude of your location in the world. The closer that you are to the equator, the shorter that the blue hour will be.
At some latitudes, such as within the polar circles, the blue hour can last for several hours during the winter season.
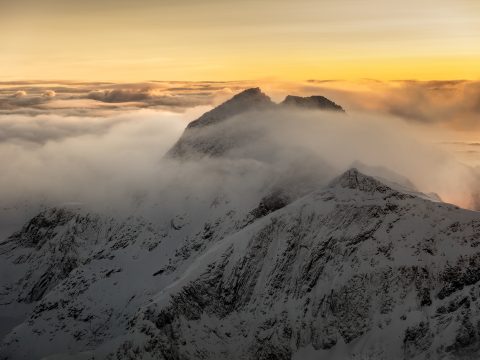
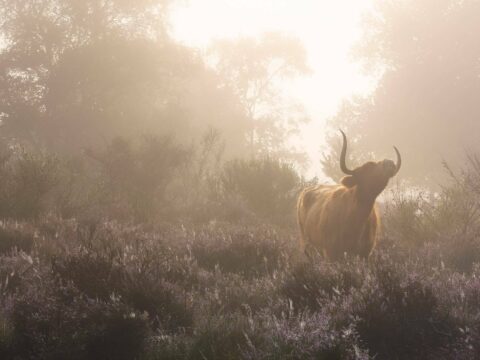
Morning and afternoon sun during ‘golden hour’ is possibly one of the best times of day for outdoor photography.
The golden hours occur in the period of time right after sunrise and shortly before sunset, when the sun’s rays are at a 10° angle to the Earth’s surface. The angle of the light, combined with the thickness of the atmosphere, creates a diffused and golden glow.
The length of golden hour is highly dependent on where you are in the world. Generally, it lasts for about an hour after sunrise and begins an hour before sunset.
The closer that you are to the equator, the shorter that this timeframe will be.
Sunrise is a wonderful time for landscape photography. It is much more difficult to get up early than it is to go to bed late, so there might be fewer people around, making it a quieter time to be out in nature.
This is the moment when the sun rises above the horizon though in general, it encompasses the entire period from when the blue hour finishes to the end of the golden hour.
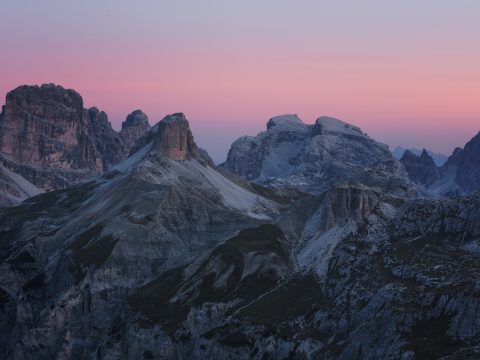
During sunrise, there is the potential for gorgeous red and pink hues to be cast throughout the sky.
Again, the duration of sunrise is largely dependent on where you are, as well as the season. Sunrises close to the equator during summer can be over within a few minutes. On the other hand, a sunrise above the Arctic Circle or below the Antarctic Circle during winter can last for several hours.
Sunset is possibly the most popular time for landscape photography. It’s much easier to prepare for than sunrise and you’ll have the whole day to get yourself ready!
The word ‘sunset’ refers to the moment that the sun dips below the horizon. At this moment, if the horizon is clear, then it is likely that the clouds will light up with deep red and pink hues. This is why it’s one of the best times to take pictures on the beach!
Depending on your location and the time of year, sunset can last for a few minutes to a few hours. The closer that you are to the equator, the faster that the sun will move below the horizon.
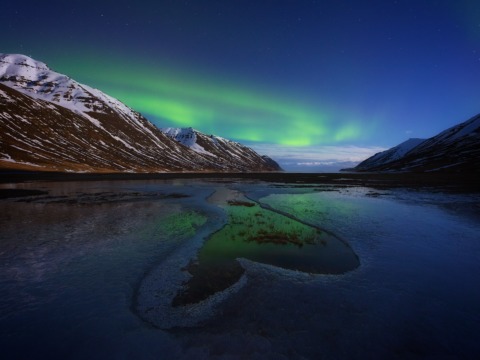
Night time is when the magic really happens. If the sky is dark enough, then you will be able to photograph stars, Northern Lights, the Milky Way and other astronomical phenomena.
When photographing the landscape, moonlight can help to illuminate the foreground.
In the northernmost and southernmost parts of the world within the polar circles, there may be up to 24-hours of night during the middle of the winter months. This gives photographers plenty of time in which to shoot.
The closer that you get to the equator, the shorter that the duration of night time will be so be sure to plan accordingly.
The worst time of day for landscape photography is usually when the sun is at its highest in the sky. This is because harsh lighting from the top down can make your images seem flat and two-dimensional.
Rather than trying to take pictures of vast landscapes on a sunny day, it’s best to focus on more intimate details in the landscape around you, such as patterns in the mud beneath your feet or interesting details in the surrounding foliage.
The best weather conditions for landscape photography differs, depending on what you want to achieve. Some people prefer to shoot dark and moody scenes on a grey and stormy day, while others prefer clear skies and golden light. It rests a lot on the emotion that you want to capture and the atmosphere that you want to convey.
If you are a beginner to photography, try shooting in all kinds of weather conditions. This will help you to figure out what you like and to develop your own style.
If you never shoot when it’s dreary, then try heading out on a cloudy day. Overcast weather means that the light is more diffused, which is great for environmental portraits, macro photography (such as photographing fungi) and capturing abstract details.
Fog and rain are some of the best conditions for shooting in a forest, as they help to provide some depth and vibrancy to the surrounds.
While a blanket of clouds does not make for great star photography weather, some degree of clouds in the sky is needed to catch the colours during sunrise and sunset.
The second step in planning your landscape photography trip is to narrow down a few locations at your main destination that you might want to shoot.
Have you ever wondered how other photographers find locations for landscape photography? With the right resources, you won’t have to venture very far at all to stumble across amazing spots. In fact, it’s possible to find great landscape photography locations close to home or nearby to where you plan to be travelling.
Here is a list of some useful tools for location scouting from the comfort of your home.
Before you even head out the front door, try conducting a search on Google Maps for interesting locations. It offers satellite imagery, aerial photography, street maps and even 360° interactive panoramic views of certain areas.
One of the benefits of Google Maps is that you can share saved coordinates with your family, friends and travel partners, making it easier to plan your next photography trip and to let others know where you’ll be.
You can also use Google Maps or another web mapping platform for route planning, whether you’re travelling by foot, car, air or public transport. This is great for working out how long it will take you to get to your destination and which route is the best to take.
When scouting for locations and estimating your travel time using Google Maps, remember to factor in other variables such as weather conditions, accessibility and your own level of fitness.
One of the limitations of Google Maps is that sometimes, the information may not be accurate. Occasionally, it may direct you on an inappropriate route that takes you to the wrong destination or which leads you through dangerous terrain. If the area that you want to visit is very remote, then it is likely that there may not be data for the location on Google Maps at all.
Take your location scouting one step further by using Google Earth to see the world in 3D. You can either download it as a standalone program on your computer, as a smartphone app or use it via the free web interface online.
The benefit of using Google Earth is that you can fly anywhere on the planet without even getting off your couch. It will give you a 3D view of the landscape, meaning that you can explore possible locations for photography from different angles.
Additional layers in Google Earth provide a wealth of geographical information. In some cases, you’ll be able to drop down to street view to see what the surrounding terrain is like, measure the distance between you and your subject, and even check out photos that other users have uploaded from the same location.
Although Google Earth is extremely detailed, not all areas of the world are covered. Some less developed countries are poorly presented on the maps, while military zones and other sensitive areas may be restricted.
Many tourist information centres offer walking guides and hiking maps for free or a small fee. You can pick these up in person or order them online. Some are even accessible on the Internet, particularly on tourism websites.
Walking guides and hiking maps are useful as they often point out little-known attractions along the way to more well-known destinations. They’ll also usually include notes about the difficulty of the terrain, what you’ll need to maintain your safety in the area, likely hazards that you might encounter and how long it might take to get to your photography location.
As a bonus, you can also bring your walking guide or hiking map along with you when you finally decide to head out. They’re very useful in areas without mobile phone coverage or if you want to save the battery on your phone to use in case of an emergency.
When it comes to inspiration, photo sharing websites and apps such as Flickr, SmugMug, Pinterest, Instagram, 500px and 1x.com can offer a wealth of landscape photography ideas.
They’re particularly useful for researching when it might be best to travel to certain destinations in order to achieve an image that you are hoping to capture.
Use the search functions to look up any destination you want, as well as more specific queries. Most of these platforms have a built-in hashtag system, allowing users to pin useful data such as subject matter, seasons and more. You can even look up generic terms, such as #landscapephotography or #nature.
Be sure to read the captions of images that are shared, as users can often offer quite a lot of insight into what was involved in capturing their shots. Information like this can be very useful when it comes to planning your own trips.
The third step in planning for landscape photography is to prepare for the conditions. These might be events that can be mapped ahead of time, as well as variables that might change in the future.
Elements to consider include the position of the sun, moon or stars in the sky, the weather, tides and other meteorological or geological events.
These are some useful resources that will help you in your preparation.
If you’re interested in full moon landscape photography or capturing the sunset in a certain alignment, then sun and moon calculators such as SunCalc and Moon Exposure Calculator will help you to plan the movements of these celestial bodies well ahead of time.
You can use these calculators to track movements, meaning that you’ll be able to figure out times for sunrise, sunset, moon phases and even when certain parts of the Earth will be illuminated by sunlight.
A more streamlined way to plan your location shoots is to use PhotoPills. This powerful smartphone app is more than just a calculator to help you plot sunrises and sunsets. In addition to predicting the position of the sun and the moon, it has an augmented reality feature that allows you to see exactly where they’ll be in the sky at any given moment in time.
Other features include being able to map out Milky Way alignments and astronomical events such as meteor showers, functions that help you to calculate depth of field and exposure time, as well as options to assist you with calculating the parameters needed for shooting star trails and time lapse videos.
This extremely useful app costs just $10.99 USD. It is available on Google Play for Android, as well as the Apple App Store for iOS.
Full disclosure: I have been a PhotoPills Master and have previously taught at a PhotoPills camp but I am not currently being paid to promote it in this post.
We all know that the weather is perhaps one of the most likely factors that will have a huge impact on your landscape photography. As a landscape photographer, you should always prepare for your shoot by checking local weather forecasting sites.
Checking the forecast in advance will help you to figure out when might be the best time to head out and take advantage of the weather conditions for your landscape photography. It will also help you to avoid severe weather events that might make it impossible to shoot or even affect your safety.
In addition to checking the weather, there are certain conditions that landscape photographers either strive for or seek to avoid. While cloud cover and rain can put an end to your night or star photography, fog is sometimes welcome – particularly when it comes to forest photography.
Most countries around the world provide local fog and mist predictions through national meteorological office websites. Some examples include the Icelandic Met Office, Australian Government Bureau of Meteorology, and the Royal Netherlands Meteorological Institute.
There’s nothing worse than heading to your photography location by the sea and finding it completely submerged at high tide. There’s also nothing more dangerous than being caught out on a rocky ledge with your camera as the tide is coming in.
To ensure your safety, it’s important to monitor water levels for coastal photography.
Before you head out, make sure to check local tide charts. These are usually available via your country’s national meteorological office website. Otherwise, Tide Forecast is a handy tool that provides accurate tide times and animated tide charts for thousands of locations around the world.
If you would like to photograph the Northern or Southern Lights, then it’s worthwhile to check the aurora forecast for your destination.
Space Weather Live has a free push notification service that you can sign up for which will send you information about geomagnetic activity, solar radiation storms, solar flares, coronal mass ejection impacts, coronal holes and more.
Aurora Alerts is another useful smartphone app that monitors aurora borealis activity in the Northern Hemisphere.
In my experience, it also pays to monitor webcams for auroral activity in other parts of the world close to yours, as they can help you to predict what time the aurora will be likely to make a display in your location.
See the Aurora and Aurora Service Europe both provide livestreams from observatories around the world, including Arctic Norway, Canada, Finland, Sweden, Iceland, New Zealand, Antarctica and the United States.
Aside from monitoring auroral activity, webcams are also useful for keeping track of other conditions that might be important as you plan your next photography trip.
You can use webcams to see whether hiking trails in Iceland are covered in snow, whether there is fog at the Golden Gate Bridge, if a certain waterfall is flowing, to check whether it’s raining in a location before you head out and more. Simply do a query for webcams using your favourite search engine.
The final phase in planning for your landscape trip is to get ready for the shoot. This involves a series of steps in the days and even weeks leading up to the moment that you’d like to head out.
If possible, try visiting your photography location ahead of time. This way, you’ll be able to get a feel for possible compositions and how the light interacts with the environment. Factors such as these can have an impact on how you choose to photograph the landscape, as well as influence the camera gear and photography techniques that you might choose to employ.
If it’s not possible to make a day trip to your destination, be prepared to arrive early on the day of your shoot so that you’ll have enough time to scout the location by foot and to visualise the shots that you’d like to achieve.
On the day before you plan to head out, clean your lenses, make sure that all of your equipment is in working order and that your batteries are charged.
You might even find it useful to lay out all of your gear and keep a checklist as you pack your camera bag so that you won’t leave anything important behind.
If you’re not sure about what camera equipment to purchase, then you might be interested in learning the truth about what you need to get started with landscape photography.
Only you know what will be of most use to you during your shoot, depending on your own style of photography. In general though, you’ll probably find the following checklist to be useful:
If you’d like to get a little bit more in-depth, feel free to refer to this comprehensive list of landscape photography gear that you might need.
Perhaps one of the most important things you can do is to make sure that you’re prepared for any unpredictable events. In alpine locations or even by the sea, extreme weather can occur without much warning.
Here is a list of items that are useful to carry with you just in case things do go a little pear-shaped.
If you plan on heading out to a remote location, let people know where you’re going and how they might be able to contact you. Make sure that you familiarise yourself with the local emergency phone number and that you have enough food and water to last you for the entire duration of your trip.
If the weather does take a turn for the worse, don’t be afraid to turn around. It’s better to come back on another day to capture the perfect shot than to continue forwards into conditions that might place your safety further at risk.
Now that you’ve got the lowdown on how to plan your landscape photo shoot, you’ll be well prepared to head out into nature.
Planning your trip will put you in the best position to take home great photographs though it’s a good idea to leave room for flexibility, in case of unpredictable events or conditions that might arise.
Above all else, enjoy your time out there shooting and don’t forget to have fun!
Have you got any other tips for planning a landscape photography shoot? Leave a comment below!
Subscribe via social media or newsletter to receive free photography tips.